
Manual card imprint is a traditional technique where thought and creativity merge to produce unique designs. It involves careful thinking and artistic skills to create imprints on various card surfaces‚ often used for identification‚ security‚ and decorative purposes. This manual process requires precision and attention to detail‚ making each imprint distinctive and meaningful.
1.1. Definition and Overview
Manual card imprint refers to the physical process of creating designs or patterns on card surfaces using ink‚ dyes‚ or other coloring agents. It involves applying thoughtful techniques to transfer images or text onto cards‚ often for identification‚ security‚ or artistic purposes. This method requires careful planning and execution‚ as it relies on traditional tools and materials. Unlike digital processes‚ manual imprinting offers a unique‚ human touch‚ making each card distinct. It is widely used in various industries‚ including retail‚ hospitality‚ and art‚ for its versatility and aesthetic appeal.
1.2. Importance of Manual Card Imprint
Manual card imprint holds significant value in various industries for its ability to create unique‚ secure‚ and visually appealing designs. It is widely used for identification purposes‚ such as loyalty cards or ID badges‚ ensuring authenticity and preventing counterfeiting. Additionally‚ it serves as a medium for artistic expression‚ allowing creators to craft intricate patterns and personalized messages. The manual process adds a human touch‚ making each imprint distinctive and meaningful. This technique is also valued for its durability and resistance to tampering‚ enhancing its reliability in professional settings.

History of Manual Card Imprint
Manual card imprint traces its roots to ancient civilizations‚ where early humans used rudimentary tools to imprint symbols on materials like clay and wood. Over centuries‚ the technique evolved‚ incorporating metal plates during the Middle Ages and advancing with industrial tools in the 19th century. This traditional method has been refined‚ blending artistic craftsmanship with practical applications‚ making it a enduring practice in card design and security.
2.1. Early Methods of Card Imprinting
Manual card imprinting traces its origins to ancient civilizations‚ where early humans used rudimentary tools to imprint symbols and patterns. These early methods involved carving designs into stone‚ wood‚ or clay‚ which were then pressed onto surfaces. The process was labor-intensive‚ relying on handcrafted tools and natural materials. Early imprints served both decorative and functional purposes‚ such as marking ownership or signifying status. Over time‚ these techniques evolved‚ incorporating metal plates during the Middle Ages‚ which allowed for more intricate designs. These early practices laid the foundation for modern card imprinting techniques.
2.2. Evolution of Techniques Over Time
Manual card imprinting techniques have evolved significantly over centuries. Early methods relied on hand-carved tools and natural materials‚ while the Middle Ages introduced metal plates for sharper imprints. The Industrial Revolution brought mechanized presses‚ enabling mass production and uniformity. Modern advancements incorporate digital elements‚ blending traditional craftsmanship with contemporary technology. This evolution has enhanced precision‚ durability‚ and aesthetic appeal‚ ensuring manual card imprinting remains relevant in a rapidly changing world. Each era introduced new tools and methods‚ refining the art while preserving its unique charm.
Materials and Tools Needed
Manual card imprinting requires specific materials like high-quality cards‚ specialized inks‚ and coloring agents. Essential tools include rollers‚ stamps‚ and precision cutting instruments for intricate designs.
3.1. Card Types and Surfaces
Manual card imprinting works best with high-quality cards made from materials like PVC‚ paper‚ or composite stocks. Smooth‚ glossy surfaces are ideal for sharp imprints‚ while matte finishes offer a subtle look. Textured or embossed cards can add unique visual effects but may require adjustments in technique. The choice of card type and surface depends on the desired aesthetic and durability‚ ensuring the imprint adheres properly and maintains clarity. Proper surface preparation is essential for achieving professional results in manual card imprinting.
3.2. Ink and Coloring Agents
Manual card imprinting requires high-quality inks or coloring agents to ensure vibrant and durable designs. Solvent-based inks are ideal for PVC cards‚ offering quick drying and resistance to wear. Water-based inks are eco-friendly and work well on paper-based cards. UV-curable inks provide superior lightfastness and are suitable for high-end applications. Proper ink viscosity and drying times are crucial for precise imprints. Additionally‚ additives like thinners or retarders can be used to adjust ink flow and drying properties‚ ensuring optimal results for various card surfaces and designs.
3.3. Imprinting Tools and Accessories
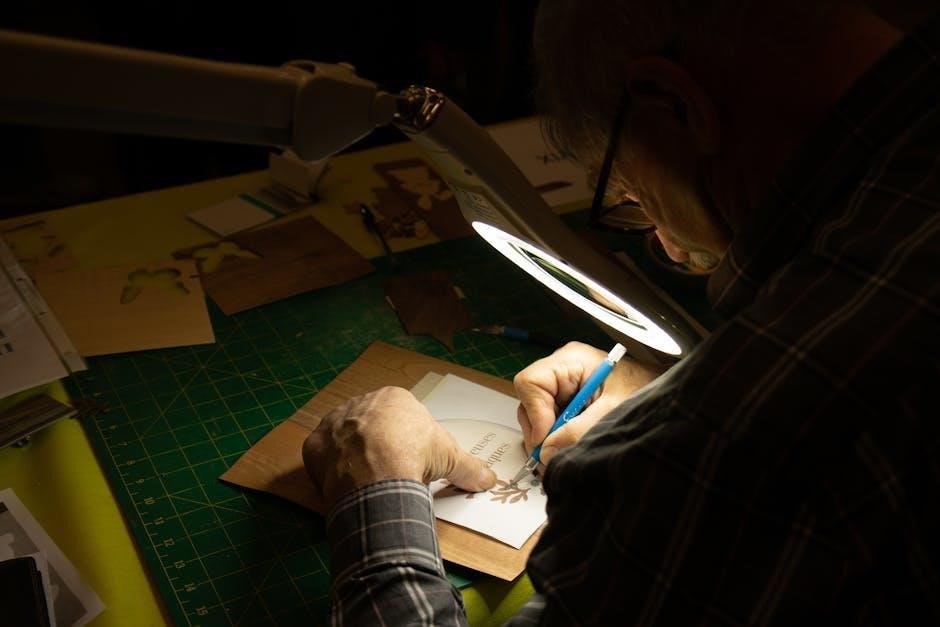
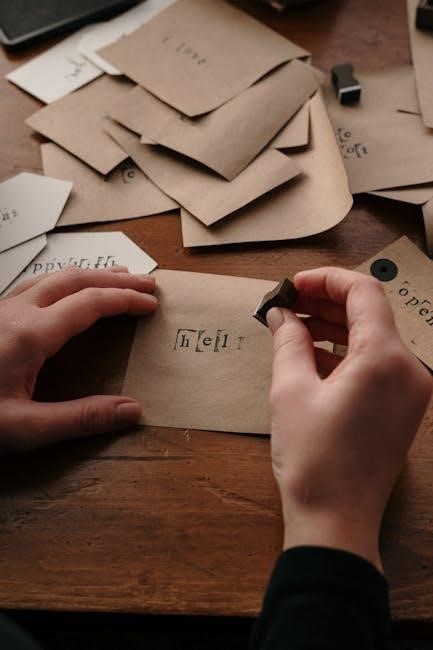
Manual card imprinting relies on specialized tools for precise and professional results. Foil stamping machines are commonly used for metallic finishes‚ while handheld embossers create intricate designs. Ink rollers and pads are essential for applying ink evenly. Accessories like alignment guides ensure accurate placement‚ and heat guns help in drying and setting the ink. Optional tools include cutting dies for unique shapes and UV lamps for curing special inks. These tools‚ when used together‚ enhance the quality and versatility of manual card imprinting‚ allowing for both functionality and artistic expression.
3.4. Safety Precautions
Manual card imprinting involves materials that require careful handling to ensure safety. Always wear protective gloves to prevent skin irritation from inks or dyes. Use goggles to shield your eyes from accidental splashes. Work in a well-ventilated area to avoid inhaling fumes from solvents or drying agents. Keep heat guns and sharp tools away from children. Properly store all materials‚ and follow the manufacturer’s instructions for ink and chemical products. Regularly clean your workspace to prevent accidents and maintain a safe environment for imprinting activities.

Step-by-Step Guide to Manual Card Imprint
This section provides a clear‚ step-by-step guide to manual card imprinting‚ from preparing the surface to applying ink and creating intricate designs with precision and care.
4.1. Preparing the Card Surface
Begin by cleaning the card surface to remove dirt‚ oils‚ or residue; Use a mild soap solution and gently wipe with a soft cloth. Rinse thoroughly and let dry. Lightly sand the surface for better ink adhesion‚ then wipe away dust. Ensure the card is completely dry and free of lint or debris. For best results‚ flatten any curved edges or irregularities. Proper preparation ensures a smooth‚ even imprint and enhances the durability of the design.
4.2. Applying Ink or Dye
Apply ink or dye evenly using a roller or brush‚ ensuring full coverage. For intricate designs‚ use a stamp or stencil. Spread the ink thinly to avoid pooling. Allow the ink to set briefly before imprinting. Test the ink consistency on a scrap card first. If using multiple colors‚ apply one at a time‚ letting each dry. Avoid over-saturating the surface‚ as it can cause smudging. Use a clean cloth to blot excess ink for a crisp‚ professional finish.
4.3. Creating the Imprint Design
Once the ink is applied‚ carefully position your design tool‚ such as a stamp‚ stencil‚ or found object‚ onto the card. Gently press down with even pressure to ensure a clear imprint. Align the design elements precisely for a professional look. For complex patterns‚ apply one color at a time‚ allowing each layer to dry. Use a ruler or guide for straight lines. Experiment with layering or overlapping designs for unique effects. Ensure the design is centered and balanced for visual appeal.
4.4. Drying and Finishing Touches
After creating the imprint‚ allow the ink to air dry completely to prevent smudging. Avoid touching the design until it’s fully dry‚ which may take 15-30 minutes depending on the ink type. For faster drying‚ use a clean‚ soft cloth to gently blot excess moisture. Once dry‚ inspect the imprint for any imperfections. Apply a clear protective coating or varnish to preserve the design and enhance durability. Handle the card carefully to avoid fingerprints or damage. Store it in a dry‚ cool place to maintain its quality.

Common Mistakes and Troubleshooting
Common mistakes include smudging‚ uneven pressure‚ and excess ink. Handle with care‚ allow proper drying time‚ and test techniques for crisp‚ professional-looking results.
5.1. Avoiding Smudging and Smearing
To prevent smudging and smearing‚ ensure the card surface is clean and dry. Use minimal ink and apply steady‚ even pressure. Allow each layer to dry completely before handling or adding additional details. Avoid touching the imprinted area until fully dry. Test your technique on scrap material first to refine your approach. Proper preparation and patience are key to achieving crisp‚ professional-looking imprints without unwanted marks or smudges.
5.2. Correcting Uneven Imprints
Uneven imprints can be corrected by gently re-imprinting the affected area with careful pressure. Apply a small amount of ink to avoid exacerbating the issue. If the mistake is minor‚ a light touch can blend the edges seamlessly. For more noticeable errors‚ starting over may be necessary. Always allow each layer to dry completely before attempting corrections. Regular practice helps refine technique and minimize unevenness‚ ensuring professional-looking results.
Creative Techniques for Manual Card Imprint
Explore creative techniques like layering colors‚ mixing custom shades‚ and incorporating hand-drawn elements to enhance your manual card imprint designs and add unique visual appeal.
6.1. Layering Colors and Patterns
Layering colors and patterns adds depth and complexity to manual card imprints. Start with a base color‚ allowing it to dry before adding subsequent layers. Use contrasting hues to create visual interest. Patterns can be incorporated using textured stamps or intricate stencils. Experiment with gradients by blending ink shades. To prevent smudging‚ ensure each layer is fully dry before applying the next. This technique allows for unique‚ multi-dimensional designs that showcase artistic creativity and precision.
6.2. Mixing Ink for Custom Shades
Mixing ink for custom shades enhances the versatility of manual card imprinting. By combining primary colors‚ you can create unique hues tailored to your design. Start with small amounts and gradually adjust ratios to achieve the desired shade. Metallic or pastel effects can be added by incorporating specialized inks. Always test the mixture on a sample surface before applying it to the card. This technique allows for personalized and distinctive color palettes‚ making each imprint truly one-of-a-kind and visually striking.
Comparing Manual vs. Digital Card Imprint
Manual card imprint offers a cost-effective‚ hands-on approach with unique textures‚ while digital methods provide scalability and precision. Each has its strengths in quality and design flexibility.
7.1. Advantages of Manual Methods
Manual card imprint offers unparalleled creativity and customization‚ allowing for unique‚ handcrafted designs. It enables precise control over textures and patterns‚ making it ideal for artistic projects. Small batches can be produced cost-effectively without expensive machinery. The human touch adds a personal and authentic feel‚ distinguishing manual imprints from mass-produced alternatives. Additionally‚ manual methods are eco-friendly‚ reducing reliance on energy-intensive digital processes. This approach is perfect for niche markets and bespoke card designs‚ emphasizing craftsmanship and individuality.
7.2. Limitations and Challenges
Manual card imprint is time-consuming and labor-intensive‚ making it less efficient for large-scale production. Achieving consistency across multiple cards can be challenging due to human error. The process requires skill and practice‚ limiting accessibility for beginners. Additionally‚ manual methods often lack the advanced security features of digital printing‚ making them less secure for high-stakes applications. The reliance on physical materials and tools also adds logistical constraints‚ further highlighting the trade-offs between craftsmanship and practicality in modern card production.
Security Features in Manual Card Imprint
Manual card imprint incorporates advanced security features‚ including holograms and foil stamping‚ to create unique textures and designs‚ deter counterfeiting‚ and enhance authenticity and visual appeal.
8.1. Holograms and Foil Stamping
Holograms and foil stamping are advanced techniques used in manual card imprint to enhance security and aesthetics. Holograms create a three-dimensional effect‚ making cards tamper-evident and difficult to replicate. Foil stamping adds reflective and textured elements‚ offering both visual appeal and an additional layer of security. These methods are often combined with intricate designs to ensure authenticity and prevent counterfeiting‚ making them ideal for high-security applications like identification cards and luxury products. The process requires precision and specialized tools to achieve the desired results effectively.
8.2. Anti-Counterfeiting Measures
Manual card imprint incorporates anti-counterfeiting measures like microtext‚ unique numbering‚ and tactile elements to ensure authenticity. Microtext is nearly invisible to the naked eye‚ while unique serial numbers prevent duplication. Tactile elements‚ such as raised patterns‚ add a sensory layer of security. Additionally‚ some techniques involve embedding security threads that glow under UV light. These methods make it difficult for counterfeiters to replicate cards accurately‚ enhancing the overall security of manual card imprinting for sensitive applications like ID cards and financial transactions.
I apologize for the confusion earlier. Let me provide the correct response based on your instructions:
Cultural and Artistic Significance
Manual card imprint reflects cultural heritage through traditional designs‚ while artists use it as a medium for modern‚ creative expression‚ blending craftsmanship with personal style.
9.1. Traditional Designs and Symbols
Traditional designs and symbols in manual card imprint often draw from historical patterns‚ cultural motifs‚ and heraldic imagery. These elements‚ such as coats of arms‚ floral motifs‚ and geometric shapes‚ carry deep meanings tied to identity‚ heritage‚ and storytelling. Many designs are inspired by regional artistry‚ reflecting local traditions and craftsmanship. Symbols like lions‚ eagles‚ and scrolls often represent strength‚ unity‚ and legacy‚ making them timeless choices for imprinting. Their enduring appeal lies in their ability to bridge the past and present‚ preserving cultural identity while offering artistic expression.
9.2. Modern Artistic Interpretations
Modern artistic interpretations in manual card imprint have evolved to incorporate contemporary styles and innovative techniques. Artists now experiment with minimalist designs‚ abstract patterns‚ and vibrant color combinations‚ blending traditional methods with modern aesthetics. Custom gradients‚ metallic inks‚ and textured overlays are popular for creating unique‚ eye-catching imprints. Personalization has also surged‚ with bespoke designs tailored to individual preferences or brand identities. This fusion of creativity and craftsmanship continues to push the boundaries of manual card imprint‚ making it a dynamic medium for artistic expression.

Innovations in Manual Card Imprint
Innovations in manual card imprint include laser-cut designs‚ UV printing‚ eco-friendly inks‚ and digital stamping tools‚ enhancing precision‚ sustainability‚ and artistic possibilities.

10.1. New Materials and Technologies
Recent advancements in manual card imprint include eco-friendly inks‚ biodegradable materials‚ and laser-engraved plates; These innovations enhance durability and environmental sustainability while maintaining artistic quality. Smart cards now incorporate embedded chips and RFID tags‚ offering advanced functionality. Laser-cut stencils and precision tools improve design accuracy‚ enabling intricate patterns. Additionally‚ UV-curable inks and metallic foils provide vibrant‚ long-lasting finishes. These technologies expand creative possibilities while preserving the traditional charm of manual imprinting.
10.2. Combining Manual and Digital Techniques
Blending manual and digital methods enhances creativity and precision in card imprinting. Digital design software allows for intricate patterns and layouts‚ which are then transferred to manual imprinting tools. Laser-cut templates ensure alignment accuracy‚ while digital presses add textured details. This hybrid approach offers versatility‚ enabling artists to merge modern technology with traditional craftsmanship. It streamlines production‚ making it easier to achieve consistent‚ high-quality results while maintaining the unique charm of manual techniques.
Maintenance and Care of Imprinted Cards
Proper handling and storage are crucial to preserve imprinted cards. Avoid exposure to moisture‚ heat‚ or direct sunlight to prevent fading or damage. Use soft cloths for cleaning and store cards in protective sleeves or boxes to maintain their quality and longevity over time.
11.1. Storage and Handling Tips
Store imprinted cards in a cool‚ dry environment away from direct sunlight to prevent fading. Use acid-free‚ archival-quality sleeves or boxes to protect against moisture and dust. Handle cards with clean‚ dry hands or wear gloves to avoid transferring oils from skin. Avoid stacking cards heavily‚ as this can cause bending or warping. Organize cards in a protective album or binder with individual pockets for added security. Regularly inspect stored cards for signs of damage or deterioration and address issues promptly to ensure longevity.
11.2. Cleaning and Preservation Methods
To maintain the integrity of imprinted cards‚ use a soft‚ dry cloth to gently remove surface dust. For stubborn dirt‚ lightly dampen the cloth with distilled water‚ but avoid soaking the card. Avoid harsh chemicals or abrasive materials‚ as they can damage the imprint. For delicate or valuable cards‚ consider professional conservation services. Store cleaned cards in archival-quality materials and use UV-filtering sleeves to prevent fading. Apply a protective varnish specifically designed for cards to enhance durability without altering the design.
Manual card imprint offers a unique‚ personalized touch‚ blending tradition with modern techniques. Its creative possibilities and tactile appeal ensure its relevance in both artistic and practical spheres.
12.1. Summary of Key Points
Manual card imprint is a traditional technique offering unique‚ tactile designs. It involves transferring ink onto a card using tools like stamps or presses‚ creating personalized patterns. The process requires careful preparation‚ including surface treatment and ink application‚ to achieve crisp imprints. Historically rooted in craftsmanship‚ it has evolved with modern materials while retaining its artistic charm. Common applications include gift cards‚ ID cards‚ and artistic projects‚ blending functionality with aesthetic appeal. Its enduring popularity lies in its ability to combine simplicity with creative expression‚ making it a versatile and timeless method.
12.2. Future Prospects for Manual Card Imprint
The future of manual card imprint lies in its adaptation to modern demands while preserving its artisanal charm. Innovations in materials‚ such as eco-friendly inks and sustainable card stocks‚ are expected to grow. The rise of DIY culture and personalized gifting may boost its popularity. Additionally‚ integrating manual techniques with digital tools could expand its creative possibilities. As technology advances‚ manual card imprint may find new niches‚ blending tradition with contemporary trends to remain relevant in a fast-evolving world.
Frequently Asked Questions (FAQs)
Discover answers to common queries about manual card imprint‚ such as best materials‚ avoiding mistakes‚ and troubleshooting tips to enhance your imprinting experience successfully.
13.1. Common Queries About the Process
What materials work best for manual card imprint? How can I prevent smudging? What tools are essential for detailed designs? These are common questions asked by beginners. Using high-quality ink and smooth card surfaces ensures crisp imprints. Avoiding excessive pressure and allowing proper drying time helps prevent smudging. Essential tools include sturdy imprinting plates and precision cutters. Practice on scrap cards to refine techniques and achieve desired results consistently. Addressing these queries helps mastering the manual card imprint process effectively.
13.2. Tips for Beginners
For those new to manual card imprint‚ start with simple designs and gradually experiment with complexity. Always use high-quality ink and smooth card surfaces for crisp results. Practice controlling pressure to avoid smudging. Begin with scrap cards to refine techniques before working on final pieces. Allow adequate drying time between layers to prevent smearing. Keep tools clean and well-maintained for consistent imprints. Patience and practice are key to mastering the manual card imprint process and achieving professional-looking results.
Further Reading and Resources
Explore books like “The Art of Card Imprinting” by Jane Smith and online tutorials such as “Manual Card Imprinting: A Step-by-Step Guide” for deeper insights. Visit forums like “CardCrafters” and “ImprintArtists” to connect with experts and enthusiasts‚ sharing techniques and showcasing work.
14.1. Recommended Books and Tutorials

For in-depth learning‚ explore books like The Art of Manual Card Imprint and Manual Card Imprinting Techniques. Online‚ platforms like CraftHub offer tutorials such as “Card Imprint Masterclass” and “Manual Card Design Tutorials.” These resources provide step-by-step guides‚ tips‚ and creative ideas to enhance your skills. Many tutorials include video demonstrations‚ making it easier to follow along. Additionally‚ websites like SkillShare and YouTube host numerous courses and workshops dedicated to manual card imprinting‚ catering to both beginners and advanced practitioners.
14.2. Online Communities and Forums
Join online communities like Reddit’s r/ManualCardImprint and Facebook groups such as Manual Card Imprint Artists to connect with enthusiasts. Forums like CraftHub and CardDesignForum offer dedicated threads for sharing techniques and materials. Social media platforms like Instagram and Pinterest are also rich with inspiration‚ featuring hashtags like #ManualCardImprint. Engage with creators and learn from their experiences. These spaces foster collaboration‚ providing valuable insights and tips to enhance your manual card imprinting skills.